
How to do a Basic Hearing Loop Check
- Feb 8, 2021
- 7 min read
For today’s post, we're going to look at how to do a basic hearing loop system check, to make sure it's functioning properly.
Check for Error Lights
The first step is to check the front of the loop driver and look for any red lights, error lights, or any other warning signs that would signify there might be an issue with the system.

If there is something wrong, then contact your installer and let them know what the error message says.
Check Your Manual
This post is going to focus mostly on the Ampetronic D Series model, in this case, a D10-2, although all the D series operate the same. Most hearing loop drivers are going to operate fairly similar to this but do check your manual to make sure that you're looking at information specific to your model. You can find many different hearing loop driver manuals on our website here: Loop Driver Manuals
Simple Reboot
The next thing to try is a simple reboot. Just shut the power off, wait about 10 seconds, and turn it back on, usually it takes about eight seconds or so to fully boot up, but this depends on what model driver you're working with. It'll boot up and it should go through some self-checks to see if everything is connected correctly. Then hopefully just a green light pops on and you're in good shape.
Check Fuses
If it doesn't boot up, the first thing to check is the fuses. Check to see if it's blown a fuse for some reason. There's a compartment in the back where you can check the fuse and some drivers have a replacement fuse in it you can switch out. When you boot it up again watch it very carefully and make sure that the boot-up goes fine during that process. Or does it cut out of power right away, and you blew another fuse? If that happens, it signifies a more serious issue. If you have an issue like that, where it's blowing fuses, you definitely need to call a pro to check it out.
Play Music or Talk Through The AV System
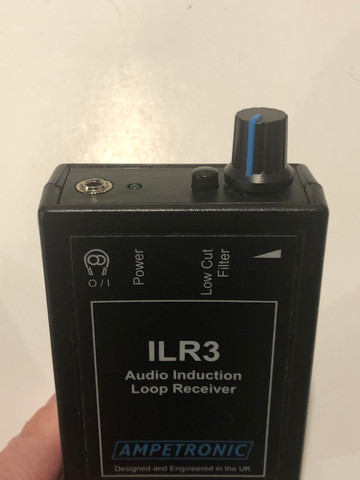
If it does boot, the next step is to play some music through it or have someone talk into the system. Once you get your hearing loop turned on and playing music through it, then grab one of your loop receivers (if you need one, you can get it in our shop), and turn it on.
Hold the Loop Listener Vertical at Seated Head Height
(About 4' high)
The key with this is to make sure you hold it about four feet high, at least that's the most common setting for a hearing loop because that's about seated head height. It’s also important to hold the loop listener vertically for the best reception. You can sometimes pick up an okay signal with other angles, but vertical is best.
Always Use the Same Volume Setting
The ideal way to listen to a hearing loop and to check with a loop receiver in the basic check is to set a “known volume”. Set the loop listener to a volume that's always the same, that way you can get a really good idea of when it sounds off. By always using the same volume setting you will be able to detect when something sounds too low or too loud.
Listen for Distortion
One of the things you can listen for is distortion. With a hearing loop, distortion is generally going to start in the high frequencies and work its way down because high frequencies take the most power in many hearing loops. However, this does depend on the system design and what you are listening to. If you do hear distortion, try switching the sound source because we want to confirm that it's from the hearing loop and not just from that sound source. Try a few different sources, and if it's still there, also try listening through the speaker system with that same source. If you can still hear the distortion through the speakers, there is a good chance the distortion is coming from something before it gets to the hearing loop.
Turn Off the Loop Driver and Listen for Humming
The next thing you can do is turn off the hearing loop driver completely and listen for humming. Many times there's some background humming in rooms and this is normal but we want to make sure it's not in excess. Note, this humming is primarily at 60 Hz and its harmonics in the US but would be at 50 Hz in Europe. It's a good idea to get an idea of what the humming is in your room. It will vary throughout the room. So, walk throughout the room, again, holding the receiver vertical, and listen to the different sound levels of the humming. If there is humming, how loud is it? What does it sound like? Is it louder in some spots than others? Note all this and keep if any areas are particularly bad, inform users not to sit there.
Hearing Aids Don’t Hear Humming the Same
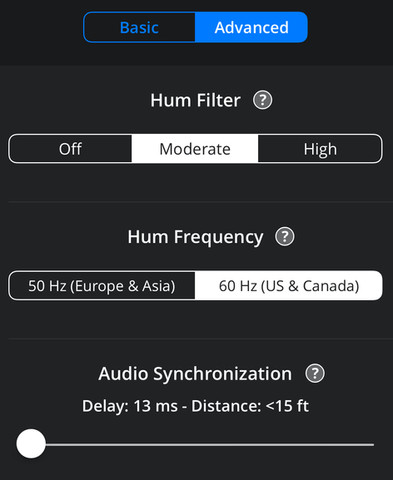
Now be aware when it comes to the humming that hearing aids and loop receivers are going to sound different. This has to do with how much they drop off the low frequencies. Some hearing aids might drop off the low frequencies a lot, some not as much. It's also going to depend on what kind of humming you have. So if a person with hearing aids is complaining about humming, they can always ask their hearing care professional to turn down some of those low frequencies for their telecoil/hearing loop mode. If you have a loop receiver, many times you can press a button or flip a switch on it, that will cut out some more of those low-frequency sounds and eliminate some of the humming. If you have a pair of loop buds (check out our shop to purchase) there's a hum filter within the app. Go into the advanced settings and then select to turn on the hum filter.


Check for Acceptable Level Variation
If you've gotten this far and the humming isn't too bad, the driver boots up okay, everything's working fine, the next thing to do is check for level variations. This is where it's going to be very important that you have a really good sense of what your volume level is on your receiver, that “known volume” we discussed above. Hold the loop listener vertically at seated head height (about 4’) and walk throughout the room. Then listen and see what those volume changes are like for the sound source you are listening to. Are there little changes or are there big swings? That's part of the international standard for hearing loops is to have about the same sound level everywhere (according to IEC 60118-4 the variation should be no more than ±3dB throughout the room).
Consider the Design of the Loop System
Another thing to note about loudness changes is that it depends on the design of the system. Some designs may have a dropout in the aisle ways where there's no signal and that might be normal and acceptable. For example, the design on the left side below uses a phased array configuration with no null lines (areas where the signal drops out). Whereas, the design on the right side uses a single array design that lines up two null lines (dark lines) through the middle of the loop system with existing aisles.


So try to understand the design of your system and where it might be acceptable for the signal to drop out. Certainly, if you're having dropouts within the seating areas that's not a good situation, and that's not a good design approach. You really want to have a system that's going to have even coverage for all seats and just make it simple for people to use. But different designs are going to have different areas where levels can change.
Check the Frequency Response With Familiar Music
The last part is to check the frequency response. Now with a basic check really all we can do is a subjective check. So put on some music or something else that you know very well and know what it should sound like, and listen to it. Does it sound too bassy, does it sound too tinny? The international standard calls for a flat frequency response throughout the room (±3dB from 100 Hz to 5,000 Hz, relative to the level at 1,000 Hz). Now understand, the hearing loop system's going to sound different than a Hi-Fi stereo but you still should get an idea of what it sounds like. This is another reason why it's good to go through these checks initially when you know the system is set right and then routinely down the road. Maybe every few months, so you can establish for yourself what it is supposed to sound like. Then you can listen and hear the changes in it if anything happens.
Check the Sound Levels That Feed the Hearing Loop Driver
One other thing to add is the most common issue that we see with loop systems is usually changing of the audio levels that feed the driver. A well-functioning loop system should be under some amount of compression. The D Series has a compression indicator on the front and what we're looking for is just a little bit of compression, not a lot, just enough to let us know that it's working. The 6 dB light is ideal. We don’t want too much compression because that can hinder the sound quality. To summarize that, check the levels that feed the loop system and try to keep those the same over time.
And then, lastly, we recommend either an annual or at least every other year, check on your system by a professional. That would be more equivalent to the advanced check. We plan to add more information on an advanced system check at a later date, but that type of test will require inputting test signals into the loop driver and measuring the result with a hearing loop meter (like the Ampetronic R1). If you're capable of doing the advanced check on your own, great. If you need to call someone in, feel free to call the person who installed your system, or you can give us a call. We can help you check the system out to make sure everything is working well.
Subscribe
That's it for today's post. If you liked it, please subscribe, we're planning many more videos about hearing loops, assistive listening, and acoustics. We won't email you too often because we are a small family company and it takes us a while to generate new posts anyway!

Comments